Innovative Hair Tinsel Braiding Techniques for Showstopping Hairstyles
When it comes to special occasions and festivals, we all yearn for that extra touch of glamour to make our hairstyles shine. Whether you’re preparing for a festive celebration or a special event or want to express your unique style, innovative hair tinsel extensions braiding techniques offer a captivating way to transform your look. In this article, we’ll explore the dazzling world of tinsel-infused braids, perfect for those moments when you want to turn heads and make a memorable entrance. Whether you’re gearing up for a festive holiday season, a summer music festival, or want to make a statement at your next big event, these innovative hair tinsel braiding techniques will help you craft a unique and memorable hairstyle.
Factors to consider when choosing hair tinsel for braiding
When choosing hair tinsel specifically for braiding, there are factors to consider that affect the final look of your hairstyle. Some of the factors to keep in mind when selecting hair tinsel for braiding include:
1. Hair tinsel material and texture
Opt for tinsel materials that are lightweight and smooth to the touch. Tinsel with a soft, non-scratchy texture is more comfortable when braiding and wearing the hairstyle.
2. Durability and flexibility
Choose hair tinsel that is durable and flexible. It should withstand the twisting and weaving involved in braiding without breaking or fraying.
3. Hair tinsel thickness
Consider the thickness of the tinsel strands. Thicker tinsel can create a more prominent and noticeable effect, while thinner tinsel may result in a subtler shimmer.
4. Hair tinsel color selection
The color of the hair tinsel is a crucial consideration for braiding. Some colors may stand out more against certain hair shades, while others may blend in for a more understated look. It’s essential to choose hair tinsel colors that complement your natural hair color or create a deliberate contrast if that’s your desired effect.
5. Length of tinsel strands
Tinsel strands come in various lengths. Longer strands can be more versatile, allowing for different braiding techniques and styles, and shorter strands may be better suited for specific designs.
6. Weight
Keep in mind that hair tinsel can add some weight to your braids. If you have finer or more delicate hair, try selecting lighter hair tinsel options to avoid putting excessive strain on your hair.
7. Personal style and occasion
Your personal style and the specific occasion for which you are braiding your hair play a significant role in tinsel selection. Choose tinsel colors and textures that align with your desired look and the event’s theme or dress code.
Creating hair tinsel braid highlights
Tinsel braid highlights are a fantastic way to introduce a touch of sparkle into your braided hairstyles. The beauty of this technique lies in its simplicity and familiarity. You can easily create this look with traditional braids like three-strand or fishtail braids without help from a professional stylist. You can then learn how to tie hair tinsel at home to achieve a chic and playful look perfect for special occasions or add glamour to your everyday style.
Steps for creating tinsel braid highlights
- Start by gathering your materials. These may include hair tinsel in a color of your choice. Prepare your hair to remove tangles so it’s smooth and easy to work with.
- Choose the type of braid you’d like to create – a classic three-strand braid or a trendy fishtail braid works well for this technique.
- Divide your hair into sections, leaving the area where you want to incorporate the tinsel open. This can be at the top of your head, along the sides, or at the back, depending on your preferred style.
- Take a few strands of hair tinsel and intertwine them with your natural hair in the selected sections. Start at the roots or near your scalp, and braid the tinsel with your hair. You can add tinsel to one strand of your hair or more hair strands for a more intense effect.
- Continue braiding your hair as you usually would, incorporating the tinsel strands. Ensure the tinsel is evenly distributed throughout the braid for a balanced look.
- Once you’ve braided to the desired length, secure the ends with a hairband or elastic. If you’d like, you can leave a small portion of the tinsel unbraided at the end for a playful touch.
- Style your hair with tinsel braid highlights as desired. Leave them loose for a flowing, glittering effect, or secure them into a bun or ponytail for a more polished look.
- Finally, use a bit of hairspray to keep the tinsel in place and prevent fraying.
Creating hair tinsel-wrapped braids
Tinsel-wrapped braids are an enchanting way to infuse your hairstyle with a dose of glitz and glam. This technique allows you to create braids, whether small or large and then elegantly wrap tinsel around individual braids to add a sparkling touch. Whether you’re aiming for a subtle enhancement or a dazzling statement, tinsel-wrapped braids are a unique way to make your hairstyle stand out.
Steps for creating hair tinsel-wrapped braids
- Start by preparing your hair to ensure it’s clean, dry, and tangle-free. You can apply some hair products for extra hold and shine.
- Choose the braid style you’d like to create. This technique works well with various braid styles, including classic, three-strand braids, Dutch braids, French braids, or fishtail braids.
- Begin by creating the base braid with your natural hair. You can create as many braids as you like, depending on your desired look. If you’re going for a large braided section, start by braiding a large portion of your hair before proceeding to wrap the hair tinsel.
- Once you’ve braided your hair, take the tinsel and gently wrap it around the braid. Start near the base of the braid if you want to wrap the entire length, or you can tie the tinsel around a specific portion of the braid, creating a layered highlighted effect.
- Ensure the tinsel is securely wrapped and doesn’t unravel. You can use a small hairpin or bobby pin to hold the tinsel in place at the start and end of the wrapped section.
- A light hairspray can help keep the hair tinsel in place and prevent stray strands from peeking out.
Creating tinsel-infused French braids
Tinsel-infused French braids are a chic and sophisticated way to combine the timeless beauty of the French braid with the added allure of shimmer hair tinsel. Achieving this look involves integrating hair tinsel strands seamlessly into the braid itself. In this section, we’ll guide you through the process of creating tinsel-infused French braids, offering tips on how to weave the tinsel into your braid for head-turning results.
Steps for creating tinsel-infused French braids
- Start with clean, dry, and tangle-free hair. You can apply a small amount of product for added hold and shine. Select the tinsel color and material that complements your hair color and the look you want to achieve.
- Part your hair as desired and section the hair you want to braid. If you’re new to French braiding, start with a one-sided French braid or a traditional center-part French braid.
- As you begin the French braid, intertwine the tinsel strands with your natural hair. When you add a new section of hair to the braid, ensure the tinsel is evenly distributed throughout the braid.
- Continue braiding your hair, incorporating the hair tinsel as you go. Maintain an even tension to keep the braid looking neat and symmetrical. French braids usually begin near the forehead and progress down the back of your head.
- When you get to the nape of your neck, you can choose to stop braiding. At this point, you’ll have a section of unbraided hair and tinsel hanging down your neck. This is a modified tinsel-infused French braid. Take the remaining hair and the tinsel and tie them into a simple knot. Once the knot is in place, secure the end of the knot with a small hairband or elastic.
- You can also choose to continue braiding the French braid until the end. You can then secure the ends with a hairband or elastic.
- Style your tinsel-infused French braid according to your preferences. You can wear it as a single braid or create multiple French braids for an intricate and elegant look.
Creating micro braids with hair tinsel
Micro braids are known for their intricate and delicate appearance. By adding hair tinsel to the mix, you can achieve a subtle yet captivating look that’s both unique and charming. In this section, we’ll guide you through the process of incorporating hair tinsel into micro braids, allowing you to infuse a touch of shimmer and brilliance into this fine, detailed style.
Steps for creating micro braids with hair tinsel
- Start by cleaning and drying your hair. Micro braids require well-conditioned and thoroughly detangled hair for ease of braiding.
- Choose the tinsel color and material that complements your natural hair color or desired look.
- Divide your hair into small, even sections to create micro braids. The sections should be fine, as micro braids are thinner than traditional braids.
- Take a tinsel strand and align it with the hair section you are about to braid. The tinsel should be folded in half, with one end extending beyond the hair section. Start the braid by intertwining the tinsel strand along with your natural hair.
- Braid your hair and the tinsel together, maintaining an even and consistent tension. Micro braids are typically smaller and finer, so patience and attention to detail are essential to achieving a polished result.
- Once you’ve braided the hair and tinsel to your desired length, secure the end of the micro braid with a small hairband or elastic.
- Style the micro braids as desired. You can leave them loose or gather them into a ponytail or updo.
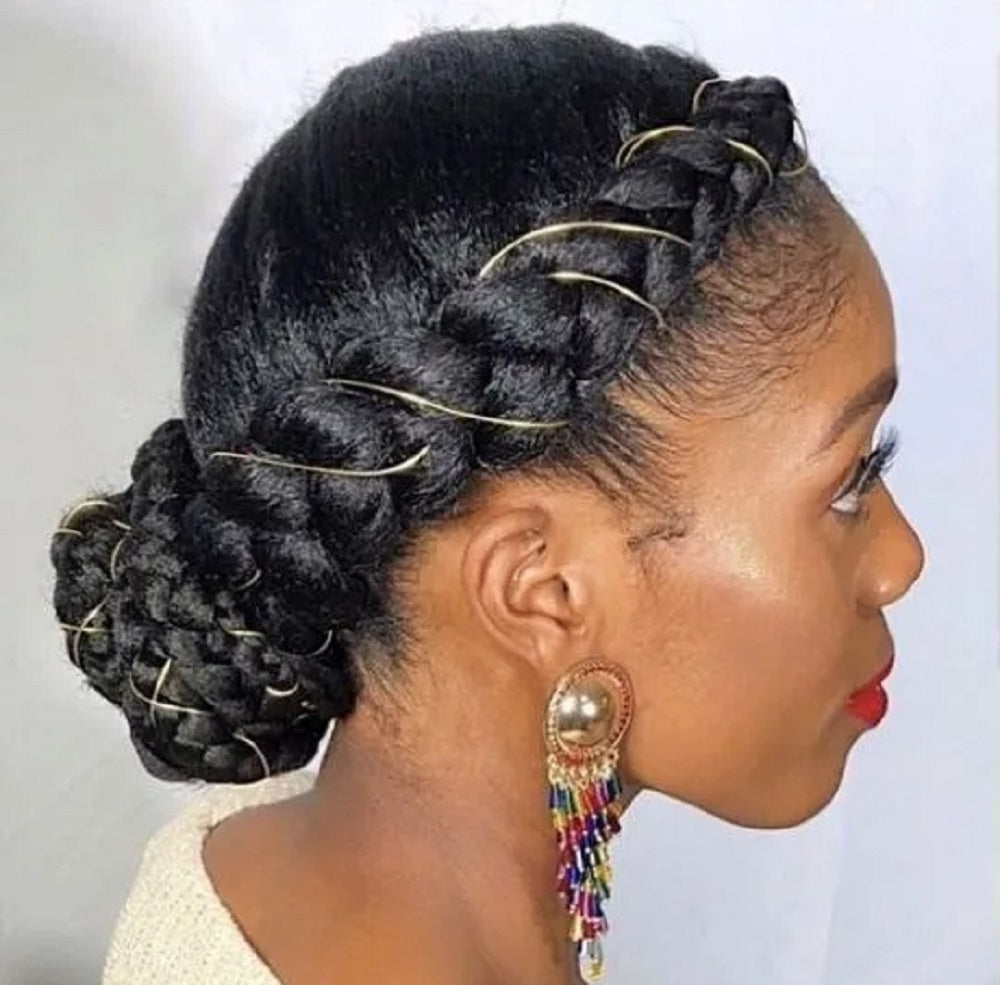
Creating a crown braid with hair tinsel
Creating a tinsel crown braid is a remarkable way to achieve a regal and unique appearance that’s fit for a queen. This intricate style combines the allure of a crown with the artistry of braided hairstyles, resulting in a head-turning, majestic look. In this section, we’ll walk you through the process of crafting a tinsel crown braid with hair tinsel, making you the center of attention at any special event.
Steps for creating a tinsel crown with braided details
- Start with clean, dry, and thoroughly detangled hair. You may add hair products for hold and shine.
- Get a tinsel hair extensions kit with the colors and materials that suit your taste and the overall look you’re aiming for. For a regal appearance, metallic or holographic tinsel often works well.
- Part your hair down the middle or slightly off-center, creating two sections. Clip one section out of the way temporarily while you work on the other.
- Begin braiding the unclipped section of hair into a Dutch braid, starting from one ear and moving around your head. Add small sections of hair to the braid as you progress along the hairline, pulling the hair toward the center.
- As you braid, incorporate tinsel strands along with your natural hair. This creates a seamless blend of shimmering strands within the braid. Ensure the tinsel is evenly distributed for a dazzling effect.
- Continue plaiting the Dutch braid until you reach the center of the back of your head. At this point, braid until you reach the end of the hair. Secure the end of the braid with a hairband or clip.
- Release the other section of hair and repeat the braiding process, starting from the ear and incorporating tinsel strands as you braid. Secure the end with a hairband when you reach the center of the back of your head. Continue braiding until you reach the end of the hair and secure the ends with a hairband.
- Take one braided section and wrap it over the top of your head, following your hairline. Use bobby pins to secure it in place. Repeat with the second braid, tucking the end under the first braid to create a continuous crown effect.
- Secure any loose ends with bobby pins, ensuring the crown braid feels secure.
- To enhance the regal charm, you can wrap additional hair tinsel strands around the crown braid.
- Spritz with hairspray to set the style and keep the tinsel in place.
Conclusion
In the world of hairstyling, creativity knows no bounds. With the innovative use of tinsel hair extensions, traditional braided hairstyles are transformed into captivating works of art. From tinsel-infused French braids to regal tinsel crown braids, the possibilities are endless. These techniques add shimmer and offer a unique way to express individual style and personality. Whether you’re preparing for a special occasion or want to elevate your everyday look, the world of tinsel braiding techniques opens the door to a world of regal elegance, playful charm, and dazzling beauty. Embrace the artistry, and let your hair be the canvas for your creative expression.